Back Bending Asanas & Gifs
exercises
baby lifting head for first time
To begin to uncover this natural ‘inflatable’ capacity for back bending, we have to start from scratch— like a baby, and feel it on a subtle level.
Flash back to the first few months of your life— Back Bending was one of your first movements
As a baby we are born into flexion, but our first movements out of it are back bends. This was a full day’s work for us then, and required coordination of an entire chain of musculature to accomplish.
This is because our head was 5% heavier in proportion to our body than it is now— that’s like going through your day with a 7.5 lb weight on your head. On top of that, add the fact that your muscles are still forming and have not even learned how to work together— that’s why a baby struggles so much to lift it’s head.
So let’s explore a few back bends imagining that we our body is just starting to work together, and that our movements would be less pronounced than they are today.
Begin lying face down. Feel your back line completely relaxed, imagine those muscles have not even fired before today. Feel your breath and feel it lift you lightly from the floor. Keep your focus on the lightness of your breath as you play with lifting your torso and legs from the floor, without actually letting them leave the floor— just playing with making them lighter.
Let yourself come back to completely relaxed in the back, and then do it again. Eventually, allow the torso and legs to leave the floor by an inch or two— try to really feel the back line doing its work to lift you— not overdoing it, just doing it.
From this space of awareness and feeling, leave your legs down and let your energy move more specifically to lifting the torso, this is the foundation of Bhujangasana.
Bring the hands under the shoulders, but don’t press down yet— first, allow yourself to continue lifting the heart evenly. Now gently pull the mat and feel that this action goes with the downward pull of the back line. Push the hands forward for a moment and feel how it actually begins to round your forward if you actually follow the musculature. This is why pulling, not pushing, the mat with the hands is a beneficial action to bhujangasana.
Relax completely, shake on the floor a little bit.
Lift once again to the baby bhujangasana, and then try lifting one leg. Notice that there is a synergy in this action, a unifying of the back line as a whole. From here, let yourself turn to one side, and then the other— which way feels better? You may have noticed that if your right leg was lifted, it feels more natural to bend and turn to the left with your torso. This is because of our spiral line of musculature that wraps diagonally through our torso. Play with leniting alternating legs, looking to the opposite side— this is the basic diagonal pattern of walking, how our fascial net catches the energy of each step in our back line, only to flick it effortlessly it into a step forward.
This is the foundation of Shalabhasana, locust pose. This diagonal turn of the torso works with the lifted leg in the most natural capacity.
Finding a Neutral Pelvis
finding a neutral pelvis is essential to inflating your back bends in the healthiest way possible and this is a surprisingly challenging task for a lot of yogis. Due to common patterns of imbalance, some bodies might not be able to find neutral right away and that’s ok. We start by shining the light of our awareness on our blind spots and we allow the body to catch up as it is ready. It’s good to start with the assumption that there is some pattern of imbalance in the hips so that you approach these poses with a sense of curiosity rather than doing it the way you’ve always done it. You can explore pelvic tilts from a variety of positions, but one of the most accessible is on the back, so that there is more tactile feedback on the sacrum and awareness of how the pelvis and the spine interact. Let’s try it!
Come onto the back and bend the knees, placing soles of feet to the floor. Bring the fingertips just inside of the hip bones. Notice the sensation of the pelvis and the spine contacting the mat.
Begin to tip the pelvis forward and back. Notice how the lumbar vertebrae over arch when the pelvis tips forward and flatten when the pelvis tips back. Find the place where the lumbar spine is a nice long curve and the sacrum can contact the mat fully. You may notice a brightening sensation beneath the fingertips as the deep core illuminates to support the pelvis in this neutral positioning.
Take several breaths, inhaling into the back ribs, preventing the back from arching. Exhale let yourself feel grounded and relaxed as the body learns this new neutral.
Extend the legs, as if you were in Tadasana notice if this increases the amount of deep core work required to maintain neutral. Keep breathing and imagine taking a "snap shot’ of this experience so that you can refind it again in the future. Don't worry, the body has an amazing memory for positions that are optimal!
Bring hands to thighs and gently reach the knees forward to peel the spine off of the mat towards a gentle bridge. Notice how most of the movement comes from the upper spine lengthening and the pelvis and lumbar vertebra remain relatively neutral.
Inflating Your Backbends Poses
Before exploring backbends, it’s helpful to awaken the deep core, so that the support is coming from the inside out, rather than superficial muscles than have a tendency to take us beyond where the core can support space in the joints.
Pose
Bhujangasana
Anatomy in Motion
Bhujangasana is the perfect pose to start training the body to support first with the deep core, and then allows the layering in of the superficial front and backlines. The prone position gives us tactile feedback of the front of the pelvis on the earth, so that we can build more awareness of the orientation of the pelvis and spine in neutral and spinal extension. Additionally, we have to lift against gravity, so this is the perfect way to strengthen our muscle teams and avoid going too far without the proper muscular support.
Set-up
from belly, draw elbows into side body and let hands float wherever is most comfortable for the shoulders, usually hands are wider apart than elbows. soften hands down to earth.
bring awareness to pelvis, allowing it to tip forward and back until you find neutral. There should be a natural, deep core engagement to maintain neutral.
keeping contact with the floor, unweight the legs to activate the deep core.
Primary movement (spinal extension)
Using the strength of the deep core, allow the spine to slowly extend from the low back up. Let the head float, keeping front and back of the throat long. Notice the work in the deep core and make sure the superficial muscles of the low back feels soft and relaxed
gently drag hands back to integrate the shoulders into the core and use the action to shorten the back line while the front line lengthens. Let the head be an extension of the spine, naturally lifting without any compression on the back of the neck.
to sync this with the breath, Try both inhaling and exhaling to rise. Inhaling up helps connect to a sense of full body expansion. Exhaling up can increase awareness of the deep core and a sense of inner stability. Try feeling spacious through both the front and back body.
Backline Exploration
sway or circle spine to allow the lateral (further from the midline) back muscles to participate. Make sure the breath is smooth and even.
Bhujangasana-Primary Movement.
Bhujangasana- Snaking and Spiraling Exploration
Bhujangasana- Snaking Exploration
Pose
Shalabhasana
Anatomy in Motion
Shalabhasana, has similar anatomical benefits to bhujangasana. Where they differ, is that bhujangasana lifts the trunk as the legs stay rooted. Shalabhasana lifts the legs while the trunk stays rooted. The result is that bhujangasana trains healthy spinal extension, whereas shalabhasana trains healthy hip extension. Practicing one leg at a time is extremely beneficial, because the split stance helps the pelvis stay neutral.
Set-up (bhujangasana set-up)
from belly, draw elbows into side body and let hands float wherever is most comfortable for the shoulders, usually hands are wider apart than elbows. soften hands down to earth.
bring awareness to pelvis, allowing it to tip forward and back until you find neutral. There should be a natural, deep core engagement to maintain neutral.
Exhaling to lift the leg is important here because this movement targets lengthening the psoas, which is a key muscle in breathing.
Primary movement (hip extension)
Keep pelvis and upper body grounded. Imagine your leg is supported only by your deep core. Reach one leg back. Exhale, allow the space from navel to arch of foot to lengthen, allowing the leg to weightlessly lift. Keep the leg lifted and continue to breath, or release the leg down and alternate sides, lifting on the exhale.
Hip Circles Exploration
Keeping the pelvis rooted, make tiny circles with the lifted leg. Notice the changing sensations in the hip socket, glutes and hamstrings as different muscles turn on to support the movement.
Note on the arms:
Classically the arms are squeezed together underneath the body, palms face down. This can put the elbows in a hyperextended position and usually is not beneficial to beginners. A common adaptation is to turn the palms face up because this will not hyperextend the elbows. You can also keep the arms outside of the body and simply reach them back, palms face down.
Shalabhasana-Primary Movement
Pose
Setu Bandha Sarvangasana
Anatomy in Motion
Setu Bandha Sarvangasana is a closed chain pose where we get to explore a buoyant core and the expansion of the front body with our feet and shoulders connected to the earth for stability. Often people overuse their arms here, so we will begin by taking the hands out of the equation, focusing more awareness on the core. With support from the deep front line, superficial back and front lines, it should feel like the pelvis effortlessly floats and the spinal extension naturally follows.
Set-up
From the back, walk heels in towards sit bones. Dragging heels will stimulate more awareness on the back line.
Test the positioning of the feet by lifting the hips and noticing sensation in the knees. Place the hips down and adjust the feet. Repeat this as many time as necessary to find a place where the knees feel supported and spacious.
traditionally arms reach towards heels. We will start with hands on thighs and allow the arms to progress from there
Primary movement (hip and spinal extension)
Exhale gently reach the knees forward, letting the front and backlines of the body lengthen evenly together. Anchor the big toes and allow the knees to track wide towards the fourth.
Inhale awareness into the back of the ribcage to place one vertebra at time back down to the mat.
repeat this action a few times- it’s okay to change the breath, both have benefits, but the exhale helps achieve more balanced length in the psoas.
Sacrum Leaf Exploration
imagine the sacrum is like a leaf, gently gliding down towards the earth, allow the low back to sway from side to side, moving slowly and gently.
Arms Exploration
Once you have explored a sense of even extension through the pelvis and spine, try placing the arms to the earth, reaching fingers towards the heels. notice a sense of increased extension in the upper spine.
Pose
Ustrasana
Anatomy in Motion
Ustrasana is a challenging pose that demands support from both Psoai (that is the true plural for psoas!). A tight psoas will limit the hip extension and pull downward on the lumbar vertebra, compressing the low back. In order to keep the legs integrated into the core, students benefit from less hip and spinal extension than they are used to. Instead, focus on a sense of brightness and support as the body extends.
Set-up
from kneeling, walk the knees out under the hips until the pelvis feel supported
tip the pelvis forward and back, allowing the front and back of lumbar vertebra to feel spacious- it can be helpful to place one hand on belly, one on sacrum to increase proprioception of the pelvis and spine through these movements.
illuminate the psoas by keeping shoulders, hips and knees in one line while bending knees to lean back. Resist the urge to allow the pelvis to tip, even if it means only leaning back one inch
Maintain a bright psoas, and end with pelvis stacked over knees
Primary movement (hip and spine extension)
Place hands on low back, fingertips down. allow the hands to gently drag downward, initiating space in the front of the hips, without flattening the lumbar curve.
make sure the breath is smooth and even. a fun experiment is to extend only on the exhale and pause movement on the inhale
allow the front line of the body to lengthen and lift as the back line anchors and pulls down
Spiral Exploration with option to deepen.
From the primary movement, take the right hand and reach forward up and back.
As the hand reaches back, push down lightly with the opposite knee (left), notice any sense of spaciousness spiraling up the body. it’s okay to let the body gently rotate away from the left knee
make several spirals with the same arm, noticing if the hand get close to the heel. If so, option to tent fingertips on the heel to expand through the front and back lines. Free the left hand and let it reach. keep breathing.
To come out, simply bend the knees bringing hips to heels. Try the second side
Slow Roll Exploration
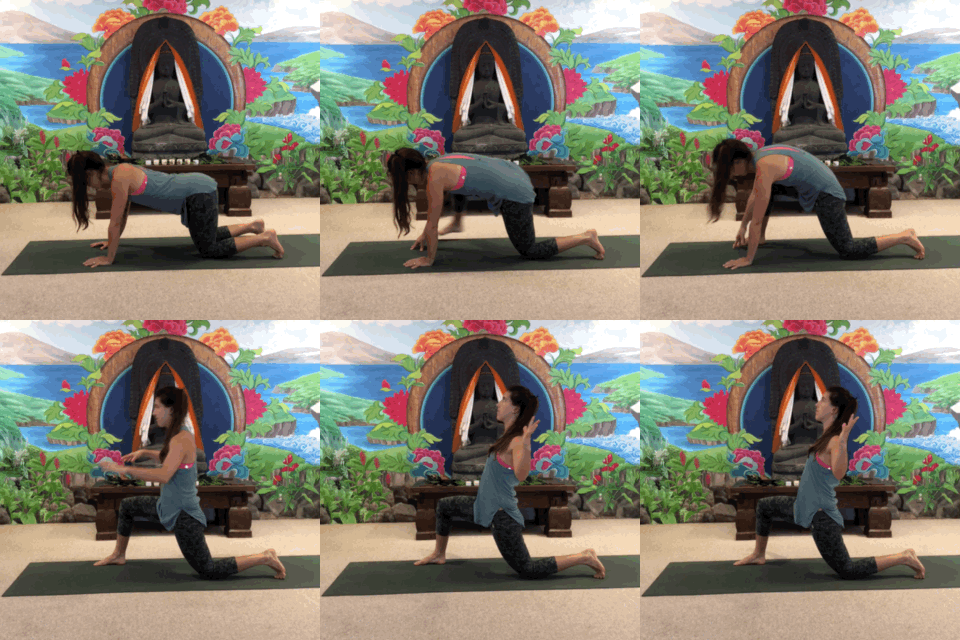
from the set up, place 2 blocks to the inside of the foot, hands gently to blocks, keeping weight in the legs.
Inhale, press into the blocks and traction the spine forward into cow. Exhale push the blocks away as you round into cat. Each time you round, notice a sense of the front body integrating, allowing for a sense of unity from quads and psoas up into rectus abdomenus and the deep core
eventually, use the exhale to slowly roll up from cat, keeping the connection cultivated in step 2.
as the spine extends, here are the arm options:
allow the arms to float as a weightless extension of the spine
at the peak of the arm float the elbows can melt
circle one arm forward, up and back, lengthening up and away from the opposite knee (as in the spiral exploration). As the arm circle repeats, bring the hands back to the blocks preparing for another round.
fingers interlace at the occiput, as the frontline extends, allow the occiput to press into the fingertips, lengthening the sternocleidomastoid.
Ustrasana-Primary Movement 1
Ustrasana-Primary Movement 2
Ustrasana-Primary Movement into Posture
Pose
Anjaneyasana
Anatomy in Motion
Anjaneyasana allows us to work with one psoas at a time as we work to find a level pelvis and explore healthy hip and spinal extension
Set-up
from kneeling, step one foot forward and subtly wide so the pelvis feels spacious.
tip the pelvis forward and back, finding the sweet spot where front and back of lumbar vertebra to feel spacious
Exhale float the arms to horizon to awaken the deep core
Note:
Most students benefit the most from this shorter, 90/90 lunge stance. Eventually, when you have successful been able to extend the whole front of the body in this set-up, it is safe to explore a longer stance, but this should not be rushed as most often this over tilts the pelvis and avoids all benefit in the psoas when done too soon.
Primary movement (hip and spine extension)
gently press into the feet to stimulate the legs and core, take several breaths to allow the whole body to lengthen and expand notice a sense of eveness from the back knee, up through the occiput as the front of the hip opens and the spine extends
Psoas Exploration
from the set-up, instead of coming into extension (primary movement) play with keeping the body straight from back knee to crown (the spine maintains it’s natural curves)
bend the back knee, tilting the body backward. notice a sense of support emanating from the deep core and hip.
option: side bend away from the back knee to lengthen the psoas as it engages.
Slow Roll Exploration
from step two the set up, place 2 blocks to the inside of the foot, hands gently to blocks, keeping weight in the legs.
Inhale, press into the blocks and traction the spine forward into cow. Exhale push the blocks away as you round into cat. Each time you round, notice a sense of the front body integrating, allowing for a sense of unity from quads and psoas up into rectus abdomenus and the deep core
eventually, use the exhale to send the hips forward, slowly rolling up from cat. Be sure to keep the connection cultivated in step 2. you can roll into a neutral spine, our keep going right into hip and spinal extension.
Anjaneyasana-Setup from Kneeling
Anjaneyasana-Setup from Table
Anjaneyasana-Setup from Down Dog
Anjaneyasana-Hula Hoop Psoas Modification
Anjaneyasana-Primary Movement
Anjaneyasana-Waving Exploration
Pose
Ardha Dhanurasana
Anatomy in Motion
Dhanurasana is our only back bend the involves a bind- when one part of the body holds on to another part of the body. This allows for the opportunity to generate more length and muscular activation, as long as we don’t force are body to go further than the deep core can support. Almost all students can feel successful while doing the single legged version, Ardha Dhanurasana. Doing both legs at the same time is quite a bit more challenging and often encourages students to push beyond where their stability can take them. Be cautious when offering the Dhanurasana exploration below.
Set-up
From Cobra (this awakens core integrity before reaching for the ankle, which often puts people in a compromised position with out an integrated core)
bend the right knee, bringing the heel in towards the glute.
Reach the right hand for the outer right foot or ankle
Extend Left arm forward. Exhale, unweight the left arm to awaken deep core
Primary movement (Hip and spinal extension)
keeping the breath smooth and even, gently kick the foot into the hand to stimulate length through the body. Let the spine extend evenly, neck and head follow. Keep the back of the throat long.
Pull on the foot to create extra resistance as you lengthen the front and back lines.
Buoyant Core Exploration
Hover left hand
exhale, lower front hand without releasing its weight to the floor notice a sense of integration from left shoulder and ribcage to right hip.
inhale lift the hand and exhale to repeat.
Dhanurasana Exploration
In step 2 of the set-up, bend both legs and reach both hands back for the outer ankles. make sure the knees don’t splay open wider than the hips and that you can breath comfortably.
keeping the breath smooth and even, kick the feet into the hands to stimulate length through the body. Flexing the foot can help increase a sense of lift through the front line.
Simultaneously, pull on the feet to create extra resistance as you lengthen the front and back lines.
the kicking and pulling should be gently, as if inviting more space for prana to flow.
Ardha Dhanurasana-Primary Movement
Dhanurasana-primary movement from Cobra
Pose
Eka Pada Kapotasana
Anatomy in Motion
Eka Pada Kapotasana is an amazing way to explore buoyant hips simultaneously with deep extension. A lot of people are addicted to the stretch sensation achieved in the front, externally rotated leg- which is often caused by overstretching ligaments. In this version, we want to have a light, expansive experience of lifting and extending with no pressure in the joints
Set-up
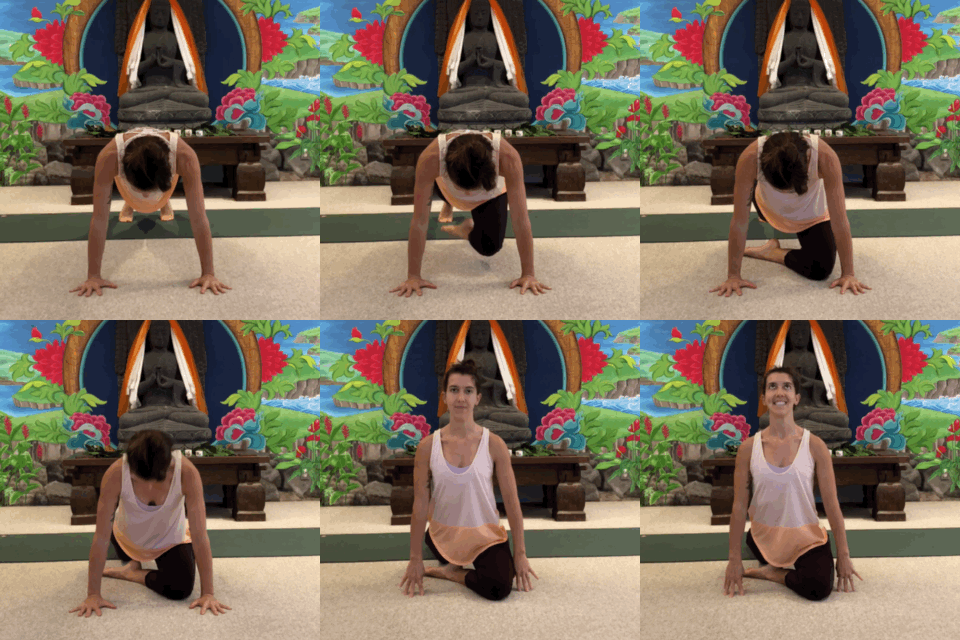
From plank, draw one knee forward and swivel the shin with the strength of the hip muscles (often people have a great flexibility in the hips than strength, so it’s important not to manually rotate the front leg- only go to where the muscles can support)
Staying in a plank shape, lower the front shin to the mat, wherever it naturally lands.
Exhale Press into the hands and front shin to send the hips backward toward the mat
inhale float back up. Repeat this pulsation, finding a place for the hips that feels buoyant and the pelvis is not being forced into an anterior tilt. Notice how you can use both legs to support the pelvis.
release the back knee, tent the fingertips and walk them in slightly to begin lifting the body.
Primary movement (Extension of Hip and Spine)
Inhale gently press the legs into the mat to unweight the rest of the body
Exhale gently scissor the legs towards one another to stimulate the deep core as you gently extend hip and spine notice a sense of even length from back foot up through the crown of the head.
Hip Circles Exploration
From the set-up, with back knee up or down, exhale draw the legs gently towards one another notice a sense of unity from the legs into the core.
Keeping this unity, begin circling the hips, drawing up energy from the legs into the pelvis and core.
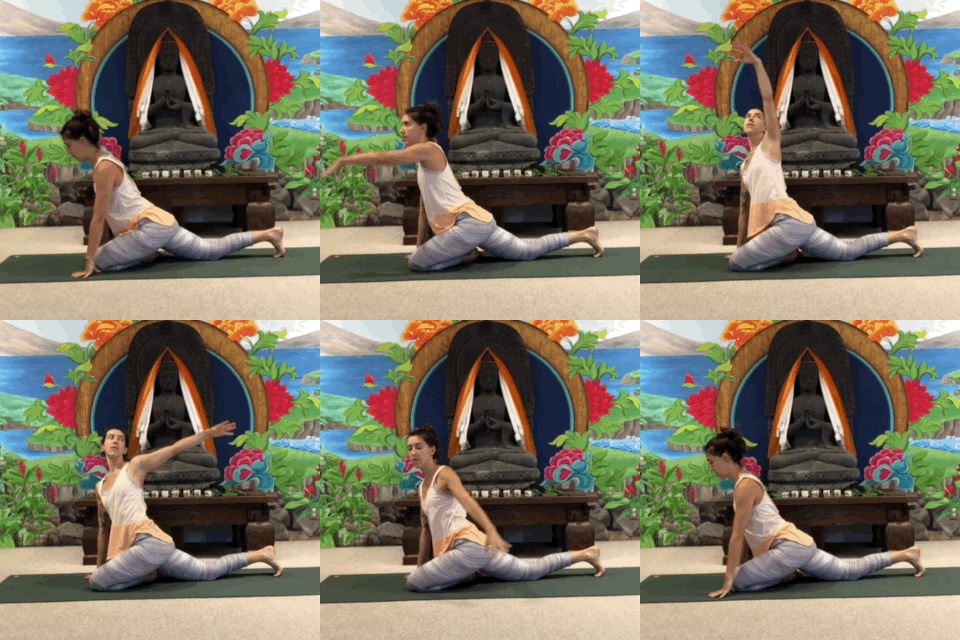
Spiraling Exploration
From the set-up (with the right knee forward)
send weight into the left hand
inhale reach the right hand forward and up, spiraling the heart to the right
exhale continue the circle back and down drawing everything to center.
make several slow circles notice a sense of the rib cage staying connected to the pelvis and core as you spiral.
Eka Pada Kapotasana-Setup Front Angle
Eka Pada Kapotasana-Setup Side Angle
Eka pada kapotasana-Spiraling Exploration
Back bends that will be covered with Inversions
Matsyasana-Setup
Matsyasana-Primary Movement
Urdhva Mukha Svanasana-Low Primary Movement
Urdhva Mukha Svanasana-High Primary Movement


